Caroline’s Craft Corner: Autumn Crafts
Autumn is here which means it is time for the fall crafting season to begin. With numerous possibilities out there to choose from, this time we will cover how to turn regular tin cans into fabulous fall decor. I made three different designs, two spooky and one plain for fall, to choose from below.
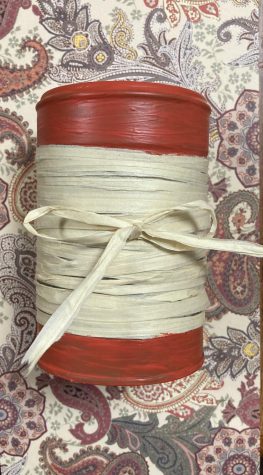
Autumn Can
- Empty tin can, can be any size
- Acrylic paint, any color works
- Scissors
- Paint brushes
- Liquid glue
- Raffia, found in local craft stores
Steps
- Start by painting the top and bottom halves of the can, you may need to do three or more coats of paint.
- Once paint is dry, glue one end of the Raffia to the top of the non painted section of the can and start wrapping it around the can.
- When you have covered the remaining non painted can space, cut then glue the end to the can. I added a bow as a finishing touch also.
Jack-o-Lantern Can
- Empty tin can, can be any size

- Acrylic paint, orange and black are the colors I used.
- A pencil
Steps
- With your can, paint all of the sides orange, this may need three or more coats to get the desired shade.
- Once the paint is dry draw on your jack-o-lantern eyes, nose and mouth with pencil and then paint over in black.
Mummy Can
- Empty tin can, can be any size
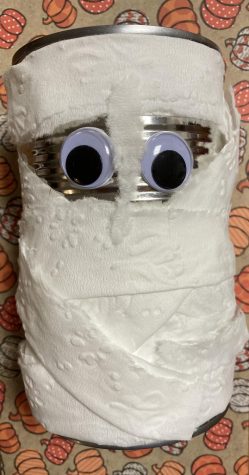
- Googly eyes
- Liquid glue
- Stripes of toilet paper, tissues work as well
Steps:
- Tear off a long amount of toilet paper
- With that length, tear it in half, then fold those two halves in half again
- Next take the toilet paper and wrap it in sections around the can. Since it is a mummy it should not look perfectly wrapped so the messier the better.
Happy Crafting!